# Azure Cloud Detection | SIEM - Sentinel

Intially I searched for "Resource Group" in the Azure search bar. Under the "Resource group" field, I entered "soc-1" as the name of the resource group.

<div align="left"><figure><img src="https://175589723-files.gitbook.io/~/files/v0/b/gitbook-x-prod.appspot.com/o/spaces%2FGKnrvJSGeWbW7GGTr6Dv%2Fuploads%2FJmiKFh2ZRwZm8mSQFygc%2Fimage.png?alt=media&#x26;token=1d9ed966-0790-4c44-94dc-9c289c13ee05" alt=""><figcaption></figcaption></figure></div>

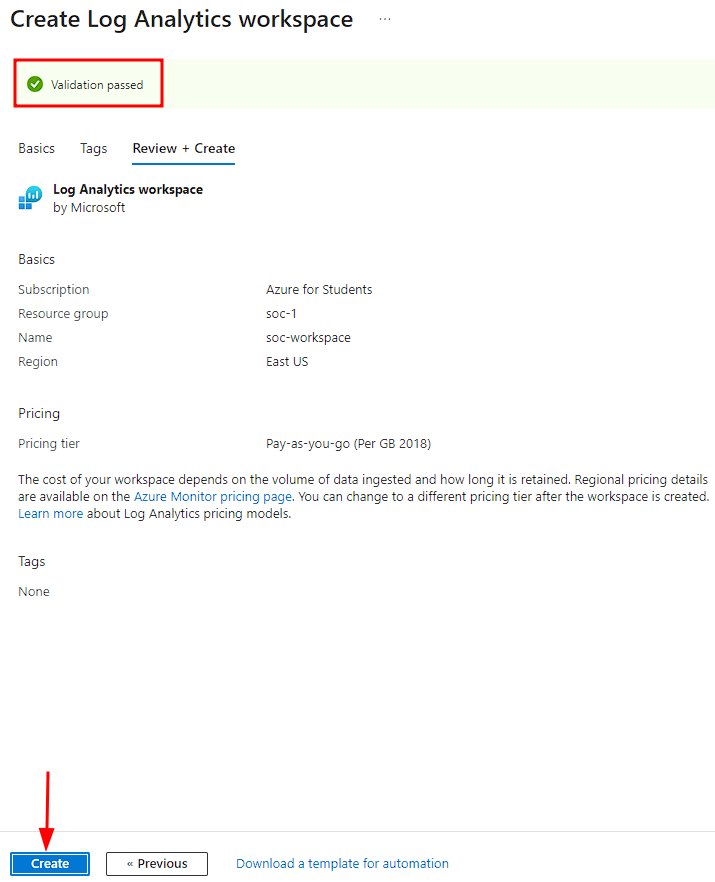
Upon clicking "Review + Create", a new window stating "Validation Passed" was displayed.

<div align="left"><figure><img src="https://175589723-files.gitbook.io/~/files/v0/b/gitbook-x-prod.appspot.com/o/spaces%2FGKnrvJSGeWbW7GGTr6Dv%2Fuploads%2Ff13JiKZbgPCcGvuM0HJv%2Fimage.png?alt=media&#x26;token=a017caea-4aa0-42c7-b1d2-d8cd149bad8b" alt=""><figcaption></figcaption></figure></div>

Upon clicking "Create", my resource group named "soc-1" was created.

<div align="left"><figure><img src="https://175589723-files.gitbook.io/~/files/v0/b/gitbook-x-prod.appspot.com/o/spaces%2FGKnrvJSGeWbW7GGTr6Dv%2Fuploads%2FQZj7GWfOJVaXw50FG3u8%2Fimage.png?alt=media&#x26;token=d1e06ec4-493b-43b0-824f-74afc6feb65e" alt=""><figcaption></figcaption></figure></div>

Once the resource group was created, the next step is to deploy a virtual machine. In this project I used Windows 10 as the operating system. I searched "Virtual Machine" in the search bar and started to create a new VM. I selected the resource group which I had created earlier. Then I assigned a name to the VM and selected the Windows 10 image. Then I set the size for the VM along with the administrator's username and password. Rest everything was kept as default. Once done, I clicked "Review + create".&#x20;

<div align="left"><figure><img src="https://175589723-files.gitbook.io/~/files/v0/b/gitbook-x-prod.appspot.com/o/spaces%2FGKnrvJSGeWbW7GGTr6Dv%2Fuploads%2FIpiIvmXigB7sXDx1Idmi%2Fimage.png?alt=media&#x26;token=14e7b607-6cee-4087-9417-a9bfcf6e9935" alt=""><figcaption></figcaption></figure></div>

<div align="left"><figure><img src="https://175589723-files.gitbook.io/~/files/v0/b/gitbook-x-prod.appspot.com/o/spaces%2FGKnrvJSGeWbW7GGTr6Dv%2Fuploads%2FJggEmomXqCfloui1kgQJ%2Fimage.png?alt=media&#x26;token=dbc803a4-4553-4dc1-8639-4c71a8d85a45" alt=""><figcaption></figcaption></figure></div>

<div align="left"><figure><img src="https://175589723-files.gitbook.io/~/files/v0/b/gitbook-x-prod.appspot.com/o/spaces%2FGKnrvJSGeWbW7GGTr6Dv%2Fuploads%2FDMlzVBpnnkSRZl4cJO4P%2Fimage.png?alt=media&#x26;token=6a849680-ac71-4fb2-a45b-0d24805d52d7" alt=""><figcaption></figcaption></figure></div>

<div align="left"><figure><img src="https://175589723-files.gitbook.io/~/files/v0/b/gitbook-x-prod.appspot.com/o/spaces%2FGKnrvJSGeWbW7GGTr6Dv%2Fuploads%2FyXHgXAYpa7keJ4THaXfJ%2Fimage.png?alt=media&#x26;token=656751f4-a531-48f5-81ef-ec61303ce95c" alt=""><figcaption></figcaption></figure></div>

Whenever a VM is deployed in Azure, it gets assigned an IP address using Virtual Network or vnet. It also gets assigned a Network Security Group (NSG) which helps to filter traffic to and from Azure resources.&#x20;

<div align="left"><figure><img src="https://175589723-files.gitbook.io/~/files/v0/b/gitbook-x-prod.appspot.com/o/spaces%2FGKnrvJSGeWbW7GGTr6Dv%2Fuploads%2F7bslCmmkgeVxLBZqlX4f%2Fimage.png?alt=media&#x26;token=72228232-e73a-4de1-a3e1-78ffc9060f77" alt=""><figcaption></figcaption></figure></div>

While creating the VM, I had enabled all traffic on pport 3389 which means an attacker can easily attack the VM. A brute force attack can be performed. To prevent this we can enable a feature called as Just In Time access. Apart from that it also implements the principle of least privilege and RBAC. To configure this, I searched for "Microsoft Defender for Cloud" in the search bar and clicked on "Environment settings".

<div align="left"><figure><img src="https://175589723-files.gitbook.io/~/files/v0/b/gitbook-x-prod.appspot.com/o/spaces%2FGKnrvJSGeWbW7GGTr6Dv%2Fuploads%2FGfvcvwycJmcl8hTTwxts%2Fimage.png?alt=media&#x26;token=de6a4ec3-3b5f-4bef-9cfd-467ba51bc496" alt=""><figcaption></figcaption></figure></div>

Then I selected my Azure subscription. Upon selection a new window opened in which I clicked "Enable All". (I had a free tier of 30 days)

<div align="left"><figure><img src="https://175589723-files.gitbook.io/~/files/v0/b/gitbook-x-prod.appspot.com/o/spaces%2FGKnrvJSGeWbW7GGTr6Dv%2Fuploads%2F6E4KrNSqv7cs5pkZqXIf%2Fimage.png?alt=media&#x26;token=066fb188-0674-4df5-80b1-ed4d8c4d2fa0" alt=""><figcaption></figcaption></figure></div>

<div align="left"><figure><img src="https://175589723-files.gitbook.io/~/files/v0/b/gitbook-x-prod.appspot.com/o/spaces%2FGKnrvJSGeWbW7GGTr6Dv%2Fuploads%2FdPbvMlPZehn6KXakwDLX%2Fimage.png?alt=media&#x26;token=6500c6ab-43b9-48fe-b39a-c21f1d96f412" alt=""><figcaption></figcaption></figure></div>

Then I went to "Virtual Machines" and selected "soc-lab-vm" machine that I had just created. From the "Configuration" option, I selected "Enable just-in-time".

<div align="left"><figure><img src="https://175589723-files.gitbook.io/~/files/v0/b/gitbook-x-prod.appspot.com/o/spaces%2FGKnrvJSGeWbW7GGTr6Dv%2Fuploads%2FRhSYz9irtcFmd5xPFGzk%2Fimage.png?alt=media&#x26;token=4499a9f9-916a-4a0b-96cb-008eb419493e" alt=""><figcaption></figcaption></figure></div>

<div align="left"><figure><img src="https://175589723-files.gitbook.io/~/files/v0/b/gitbook-x-prod.appspot.com/o/spaces%2FGKnrvJSGeWbW7GGTr6Dv%2Fuploads%2FWzsQ3iPIoh9bgdq2FsBE%2Fimage.png?alt=media&#x26;token=d8c74c37-5604-4d45-b9d9-25b6e2083def" alt=""><figcaption></figcaption></figure></div>

Then I went to the "Overview" section and clicked "Connect" and then selected "RDP"

<div align="left"><figure><img src="https://175589723-files.gitbook.io/~/files/v0/b/gitbook-x-prod.appspot.com/o/spaces%2FGKnrvJSGeWbW7GGTr6Dv%2Fuploads%2FyMKjDNP7m9UhlKn7TyTC%2Fimage.png?alt=media&#x26;token=af7082ce-42a2-4f82-be93-1beecd872613" alt=""><figcaption></figcaption></figure></div>

In the "Source IP" section, I selected "My IP" and the clicked "Request Access"

<div align="left"><figure><img src="https://175589723-files.gitbook.io/~/files/v0/b/gitbook-x-prod.appspot.com/o/spaces%2FGKnrvJSGeWbW7GGTr6Dv%2Fuploads%2FW6Uil1Z755gtQFGwSFAH%2Fimage.png?alt=media&#x26;token=cb5d88c9-80fa-4db9-8107-a3f6acef5cc3" alt=""><figcaption></figcaption></figure></div>

<div align="left"><figure><img src="https://175589723-files.gitbook.io/~/files/v0/b/gitbook-x-prod.appspot.com/o/spaces%2FGKnrvJSGeWbW7GGTr6Dv%2Fuploads%2FKjzHunS4CltehZwMMGyM%2Fimage.png?alt=media&#x26;token=d03a0967-2de4-49ca-be4d-bc3f7f200c4f" alt=""><figcaption></figcaption></figure></div>

Then I went to the "Networking" section to check if the rules got updated. The 1st screenshot shows the rules before they were updated. The 2nd screenshot shows the rules after they were updated.&#x20;

<div align="left"><figure><img src="https://175589723-files.gitbook.io/~/files/v0/b/gitbook-x-prod.appspot.com/o/spaces%2FGKnrvJSGeWbW7GGTr6Dv%2Fuploads%2FkH7aGGWgE9lBDsaXmnTD%2Fimage.png?alt=media&#x26;token=f55353cf-2328-48d5-9394-0e5e34a10f82" alt=""><figcaption></figcaption></figure></div>

<div align="left"><figure><img src="https://175589723-files.gitbook.io/~/files/v0/b/gitbook-x-prod.appspot.com/o/spaces%2FGKnrvJSGeWbW7GGTr6Dv%2Fuploads%2FDgsRLd4aGHzzEA5fA7hA%2Fimage.png?alt=media&#x26;token=ffd1e484-ac82-4074-b730-76214d045143" alt=""><figcaption></figcaption></figure></div>

Once the rules were set, I started to create the Log Analytics Workspace to store the data. To configure this, I searched "Microsoft Sentinel" in the search bar and clicked on "Create".

<div align="left"><figure><img src="https://175589723-files.gitbook.io/~/files/v0/b/gitbook-x-prod.appspot.com/o/spaces%2FGKnrvJSGeWbW7GGTr6Dv%2Fuploads%2FOPw6SmGBPseIdgxI2GP8%2Fimage.png?alt=media&#x26;token=c3bfbf00-8155-4df0-bd55-5d63025e2e1c" alt=""><figcaption></figcaption></figure></div>

On the next screen I selected "Create Workspace".

<div align="left"><figure><img src="https://175589723-files.gitbook.io/~/files/v0/b/gitbook-x-prod.appspot.com/o/spaces%2FGKnrvJSGeWbW7GGTr6Dv%2Fuploads%2FV0sedxYT72t0upMTWDaf%2Fimage.png?alt=media&#x26;token=7fe5eb1d-7890-4256-a78b-b17530c9def8" alt=""><figcaption></figcaption></figure></div>

Then I selected the resource group which I had created before "soc-1". I set the name of the workspace as "soc-workspace".&#x20;

<div align="left"><figure><img src="https://175589723-files.gitbook.io/~/files/v0/b/gitbook-x-prod.appspot.com/o/spaces%2FGKnrvJSGeWbW7GGTr6Dv%2Fuploads%2F8MprElCPgbHjplSi05Hs%2Fimage.png?alt=media&#x26;token=f63abcb5-6f83-458a-b2d0-409496d626e5" alt=""><figcaption></figcaption></figure></div>

<div align="left"><figure><img src="https://175589723-files.gitbook.io/~/files/v0/b/gitbook-x-prod.appspot.com/o/spaces%2FGKnrvJSGeWbW7GGTr6Dv%2Fuploads%2F0le6ueiCrbzbJIuHyl5e%2Fimage.png?alt=media&#x26;token=aef79939-fc1c-47cf-b906-e960b5277e54" alt=""><figcaption></figcaption></figure></div>

<div align="left"><figure><img src="https://175589723-files.gitbook.io/~/files/v0/b/gitbook-x-prod.appspot.com/o/spaces%2FGKnrvJSGeWbW7GGTr6Dv%2Fuploads%2FNvsCBO8r6dY8byA4BSwX%2Fimage.png?alt=media&#x26;token=2113a8f6-6872-4ff3-9457-888ed18b6684" alt=""><figcaption></figcaption></figure></div>

Upon clicking "Add" at the bottom of the window, the workspace got created. Now the next step was to get Data into Sentinel. Before configuring that, I checked the "Incidents" tab. It showed no incidents as I had not configured it yet. To configure this, I used data connectors. I went to the "Data Connectors" tab and searched "Windows".&#x20;

<div align="left"><figure><img src="https://175589723-files.gitbook.io/~/files/v0/b/gitbook-x-prod.appspot.com/o/spaces%2FGKnrvJSGeWbW7GGTr6Dv%2Fuploads%2FBWyVniI64hOacA0x9pJt%2Fimage.png?alt=media&#x26;token=d928999d-ebcc-490d-bd3b-7fa098d9d4f0" alt=""><figcaption></figcaption></figure></div>

I selected the "Windows Security Events via AMA" rule and on the right side of the window, I selected "Open connector page".

<div align="left"><figure><img src="https://175589723-files.gitbook.io/~/files/v0/b/gitbook-x-prod.appspot.com/o/spaces%2FGKnrvJSGeWbW7GGTr6Dv%2Fuploads%2F1irOVmH9hJtBG2RQ2mDL%2Fimage.png?alt=media&#x26;token=a113a879-a4ee-4e81-9441-ef7362c3c633" alt=""><figcaption></figcaption></figure></div>

Then I clicked on "+Create data collection rule".&#x20;

<div align="left"><figure><img src="https://175589723-files.gitbook.io/~/files/v0/b/gitbook-x-prod.appspot.com/o/spaces%2FGKnrvJSGeWbW7GGTr6Dv%2Fuploads%2F5zO27SqEi98oieqyY88q%2Fimage.png?alt=media&#x26;token=dd4b798b-4b33-488d-a84c-82b61b8ec82e" alt=""><figcaption></figcaption></figure></div>

I set the name of the rule as "soc-rule" and then clicked "Next: Resources >"

<div align="left"><figure><img src="https://175589723-files.gitbook.io/~/files/v0/b/gitbook-x-prod.appspot.com/o/spaces%2FGKnrvJSGeWbW7GGTr6Dv%2Fuploads%2FxB05HKel97DtrvAZ4qFm%2Fimage.png?alt=media&#x26;token=c2b06bc4-3b6b-4f8a-ad74-f33f85b21cf7" alt=""><figcaption></figcaption></figure></div>

In the next window, I clicked on "Add Resources"

<div align="left"><figure><img src="https://175589723-files.gitbook.io/~/files/v0/b/gitbook-x-prod.appspot.com/o/spaces%2FGKnrvJSGeWbW7GGTr6Dv%2Fuploads%2F6eUH2WVqFPZVBjf6rADi%2Fimage.png?alt=media&#x26;token=05b8250e-8d24-47e4-98ca-bb9f97eb0475" alt=""><figcaption></figcaption></figure></div>

I then selected the virtual machine that I had created.

<div align="left"><figure><img src="https://175589723-files.gitbook.io/~/files/v0/b/gitbook-x-prod.appspot.com/o/spaces%2FGKnrvJSGeWbW7GGTr6Dv%2Fuploads%2F98KXuEfzgn0QFJrevgjd%2Fimage.png?alt=media&#x26;token=2f27e83b-46ea-4146-bdb5-a87a21997f45" alt=""><figcaption></figcaption></figure></div>

<div align="left"><figure><img src="https://175589723-files.gitbook.io/~/files/v0/b/gitbook-x-prod.appspot.com/o/spaces%2FGKnrvJSGeWbW7GGTr6Dv%2Fuploads%2FrpYbTk3Czgs8cRtBjLkf%2Fimage.png?alt=media&#x26;token=0560ee4d-ee76-4083-8de7-99b96091cf2c" alt=""><figcaption></figcaption></figure></div>

Then I selected "All Security Events" in the next window.

<div align="left"><figure><img src="https://175589723-files.gitbook.io/~/files/v0/b/gitbook-x-prod.appspot.com/o/spaces%2FGKnrvJSGeWbW7GGTr6Dv%2Fuploads%2FxxQbJH7hEL9ImaeuI3Gq%2Fimage.png?alt=media&#x26;token=4df1b01a-9b49-4108-9b81-b90274db4335" alt=""><figcaption></figcaption></figure></div>

Upon clicking next, it says the validation has passed. Then I clicked "Create".

<div align="left"><figure><img src="https://175589723-files.gitbook.io/~/files/v0/b/gitbook-x-prod.appspot.com/o/spaces%2FGKnrvJSGeWbW7GGTr6Dv%2Fuploads%2FQWUweQjyzONv9nb6GKNS%2Fimage.png?alt=media&#x26;token=89a8a334-206c-4aa5-8cb7-dfccef288d74" alt=""><figcaption></figcaption></figure></div>

Once everything was configured, I checked the connection status. It showed that it was connected.

<div align="left"><figure><img src="https://175589723-files.gitbook.io/~/files/v0/b/gitbook-x-prod.appspot.com/o/spaces%2FGKnrvJSGeWbW7GGTr6Dv%2Fuploads%2FS8PBEFPu0cjOrQgCD0Dw%2Fimage.png?alt=media&#x26;token=03416e15-4443-4f28-ad00-cbf8380f4455" alt=""><figcaption></figcaption></figure></div>

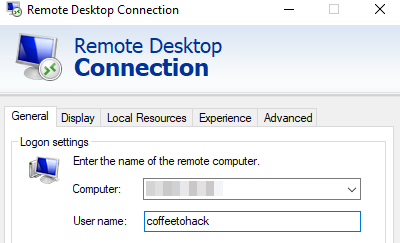
At this point of time, the VM was connected to Sentinel. The next step was to generate security events. For this, I started the Windows 10 VM. The VM has a public IP address. I used this IP to connect to the VM using RDP on my PC. I used the credentials that I had set while deploying the virtual machine.&#x20;

<div align="left"><figure><img src="https://175589723-files.gitbook.io/~/files/v0/b/gitbook-x-prod.appspot.com/o/spaces%2FGKnrvJSGeWbW7GGTr6Dv%2Fuploads%2FPgHnFbOeJqpa7oNpOaFc%2Fimage.png?alt=media&#x26;token=8b306266-fa84-4c3f-8cca-411c72683761" alt=""><figcaption></figcaption></figure></div>

<div align="left"><figure><img src="https://175589723-files.gitbook.io/~/files/v0/b/gitbook-x-prod.appspot.com/o/spaces%2FGKnrvJSGeWbW7GGTr6Dv%2Fuploads%2FofSg0RKc9m9wSk3iauN1%2Fimage.png?alt=media&#x26;token=a50b2458-460d-4725-9380-4876418a3719" alt=""><figcaption></figcaption></figure></div>

Once connected, I searched for "Event Viewer" in the search bar of Windows VM and once opened, selected "Security" under "Windows Logs".

<div align="left"><figure><img src="https://175589723-files.gitbook.io/~/files/v0/b/gitbook-x-prod.appspot.com/o/spaces%2FGKnrvJSGeWbW7GGTr6Dv%2Fuploads%2FV3LV77297VL91uZb3CEc%2Fimage.png?alt=media&#x26;token=7e041857-19e0-4e62-ad63-01c3060642a9" alt=""><figcaption></figcaption></figure></div>

Then I searched for Event ID: 4624. This indicates a successful logon.

<div align="left"><figure><img src="https://175589723-files.gitbook.io/~/files/v0/b/gitbook-x-prod.appspot.com/o/spaces%2FGKnrvJSGeWbW7GGTr6Dv%2Fuploads%2F08bGHzom9ax3QSxHjWcC%2Fimage.png?alt=media&#x26;token=52d75d94-c70c-4d37-b34c-3a98c7adee8c" alt=""><figcaption></figcaption></figure></div>

All of the data should be collected at a centralized location. In a corporate environment there are multiple endpoints and all the data from these endpoints need to be collected a certain location. To configure this, I used Kusto Query Language (KQL). This is scripting language used in Azure to extract data from logs. I went to "Microsoft Sentinel" and selected the "Logs" tab. I then added the following query to get the logon data.

```
SecurityEvent
| where EventID == 4624
| project TimeGenerated, Computer, AccountName
```

<div align="left"><figure><img src="https://175589723-files.gitbook.io/~/files/v0/b/gitbook-x-prod.appspot.com/o/spaces%2FGKnrvJSGeWbW7GGTr6Dv%2Fuploads%2F5r8HyfqbXRalq7ItXsea%2Fimage.png?alt=media&#x26;token=f2766214-8b4b-4d08-938b-a511cdc3cd98" alt=""><figcaption></figcaption></figure></div>

Upon clicking "Run", the result showed the number of times I logged on to the VM.

<div align="left"><figure><img src="https://175589723-files.gitbook.io/~/files/v0/b/gitbook-x-prod.appspot.com/o/spaces%2FGKnrvJSGeWbW7GGTr6Dv%2Fuploads%2F9JQTzVBH7HzHvJeArXWN%2Fimage.png?alt=media&#x26;token=33e7cf2c-d6e6-4e0f-98fc-4e2893a983f4" alt=""><figcaption></figcaption></figure></div>

The next task was to create an Analytics Rule. This rule will give an alert when certain events occur. The rule checks for the VM activity and if something matches the rule, it sends an alert. The alerts have details which help the analyst to start the investigation.

<div align="left"><figure><img src="https://175589723-files.gitbook.io/~/files/v0/b/gitbook-x-prod.appspot.com/o/spaces%2FGKnrvJSGeWbW7GGTr6Dv%2Fuploads%2Fq9G8C7jwbzDvc2DFmUIe%2Fimage.png?alt=media&#x26;token=5affd3c5-982a-4b1f-bca4-eeafebb65eb4" alt=""><figcaption></figcaption></figure></div>

The next task was to create a custom rule. For this lab, I created a rule which triggers an alert whenever Internet Explorer is opened. To configure this, I first created a Scheduled Task to open IE at a certain time. These events are not logged by Event Viewer by default. So, I modified the Windows Security Policy. I searched for "Local Security Policy" in Windows VM search bar and navigated to the following:

<div align="left"><figure><img src="https://175589723-files.gitbook.io/~/files/v0/b/gitbook-x-prod.appspot.com/o/spaces%2FGKnrvJSGeWbW7GGTr6Dv%2Fuploads%2FUaoRog8lFB2C0HgUNSOj%2Fimage.png?alt=media&#x26;token=638ac8ee-7dcc-4c67-af35-ba5087de5c50" alt=""><figcaption></figcaption></figure></div>

In the "Audit Other Object Access Events", I selected "Success" and "Failure". Upon clicking OK, the logging was enabled for scheduled tasks.

<div align="left"><figure><img src="https://175589723-files.gitbook.io/~/files/v0/b/gitbook-x-prod.appspot.com/o/spaces%2FGKnrvJSGeWbW7GGTr6Dv%2Fuploads%2FAI3aCinL2EZ3gMGq86Xu%2Fimage.png?alt=media&#x26;token=bd6bb1c1-62d3-4726-94c2-4b09ebfa81b5" alt=""><figcaption></figcaption></figure></div>

The next step was to create a Scheduled Task. To configure this, I searched for "Task Scheduler" in Windows VM. Then I clicked on "Create Task"

<div align="left"><figure><img src="https://175589723-files.gitbook.io/~/files/v0/b/gitbook-x-prod.appspot.com/o/spaces%2FGKnrvJSGeWbW7GGTr6Dv%2Fuploads%2FhEhm75p9FHKSoIsYXiez%2Fimage.png?alt=media&#x26;token=d11d8904-8556-4497-a353-0c0a0d8e4a82" alt=""><figcaption></figcaption></figure></div>

I set the name for the task and set the "Configure for" option to Windows 10.

<div align="left"><figure><img src="https://175589723-files.gitbook.io/~/files/v0/b/gitbook-x-prod.appspot.com/o/spaces%2FGKnrvJSGeWbW7GGTr6Dv%2Fuploads%2FHes1W5tlzf8G0qlAPA0W%2Fimage.png?alt=media&#x26;token=8a11e178-7b1c-4e1d-85ad-a5524a2e6036" alt=""><figcaption></figcaption></figure></div>

I then went to

<div align="left"><figure><img src="https://175589723-files.gitbook.io/~/files/v0/b/gitbook-x-prod.appspot.com/o/spaces%2FGKnrvJSGeWbW7GGTr6Dv%2Fuploads%2FFr43igxdGkk53SyJbCsm%2Fimage.png?alt=media&#x26;token=49be3088-19f7-4bc0-ab75-a58f85235936" alt=""><figcaption></figcaption></figure></div>

<div align="left"><figure><img src="https://175589723-files.gitbook.io/~/files/v0/b/gitbook-x-prod.appspot.com/o/spaces%2FGKnrvJSGeWbW7GGTr6Dv%2Fuploads%2FSzcceAycZGf5H9RjjCJu%2Fimage.png?alt=media&#x26;token=797117a8-f8b1-4349-8e5d-53fa5111b5b9" alt=""><figcaption></figcaption></figure></div>

Then in the "Actions" tab I selected the Internet Explorer program to run as a scheduled task.

<div align="left"><figure><img src="https://175589723-files.gitbook.io/~/files/v0/b/gitbook-x-prod.appspot.com/o/spaces%2FGKnrvJSGeWbW7GGTr6Dv%2Fuploads%2F2mLL8A7xdU0dteKvPqZB%2Fimage.png?alt=media&#x26;token=1f2c9ca0-1c49-46f2-897b-70cfb67f6590" alt=""><figcaption></figcaption></figure></div>

From the event viewer I can see that the task has been executed.

<div align="left"><figure><img src="https://175589723-files.gitbook.io/~/files/v0/b/gitbook-x-prod.appspot.com/o/spaces%2FGKnrvJSGeWbW7GGTr6Dv%2Fuploads%2FBHnEXTazJ2e8J9VexiRA%2Fimage.png?alt=media&#x26;token=56ed185b-6d59-449d-919c-d473e7cd6796" alt=""><figcaption></figcaption></figure></div>

The next step was to create a custom KQL query. To do this I went to the Sentinel homepage, and then clicked on "Scheduled query rule" under "Create".

<div align="left"><figure><img src="https://175589723-files.gitbook.io/~/files/v0/b/gitbook-x-prod.appspot.com/o/spaces%2FGKnrvJSGeWbW7GGTr6Dv%2Fuploads%2Frbzf2IaviqoDh82Dx4Kb%2Fimage.png?alt=media&#x26;token=a68da948-2c02-44a1-beee-15c160ff6668" alt=""><figcaption></figcaption></figure></div>

I then added the name of the rule, description for the analysts and tactics and techniques used.

<div align="left"><figure><img src="https://175589723-files.gitbook.io/~/files/v0/b/gitbook-x-prod.appspot.com/o/spaces%2FGKnrvJSGeWbW7GGTr6Dv%2Fuploads%2FADMRo84xZI8xl6V0F03y%2Fimage.png?alt=media&#x26;token=3e94aac7-ab0d-4048-b648-cb9145b9af52" alt=""><figcaption></figcaption></figure></div>

In the next step, I added the custom KQL query.

<div align="left"><figure><img src="https://175589723-files.gitbook.io/~/files/v0/b/gitbook-x-prod.appspot.com/o/spaces%2FGKnrvJSGeWbW7GGTr6Dv%2Fuploads%2F6UNF0PI6a8ynYsq3M8IW%2Fimage.png?alt=media&#x26;token=992a6199-c933-49a5-a761-27bce74fca92" alt=""><figcaption></figcaption></figure></div>

I kept rest everything as default and clicked "Create". The "Logs" tab showed me the event.

<div align="left"><figure><img src="https://175589723-files.gitbook.io/~/files/v0/b/gitbook-x-prod.appspot.com/o/spaces%2FGKnrvJSGeWbW7GGTr6Dv%2Fuploads%2FyVk0DjsyRKmr3FfVAp2I%2Fimage.png?alt=media&#x26;token=aba10323-956c-47f7-a75b-ab637f3f1d6d" alt=""><figcaption></figcaption></figure></div>

I expanded it and there was a lot of data available such as username, taskname etc.

<div align="left"><figure><img src="https://175589723-files.gitbook.io/~/files/v0/b/gitbook-x-prod.appspot.com/o/spaces%2FGKnrvJSGeWbW7GGTr6Dv%2Fuploads%2FFDJHn4Dr7I2Sts7qmoOA%2Fimage.png?alt=media&#x26;token=35a38861-fa72-48f8-a860-e3fbe858e60c" alt=""><figcaption></figcaption></figure></div>

I then modified the query and used the "project" command to display only the fields I want to see.

<div align="left"><figure><img src="https://175589723-files.gitbook.io/~/files/v0/b/gitbook-x-prod.appspot.com/o/spaces%2FGKnrvJSGeWbW7GGTr6Dv%2Fuploads%2FRFDkgOVLrvisv7tWGZW0%2Fimage.png?alt=media&#x26;token=52976794-40d1-4747-9cca-bed164037ed0" alt=""><figcaption></figcaption></figure></div>

I then modified the Analytics Wizard rule with the above query.

<div align="left"><figure><img src="https://175589723-files.gitbook.io/~/files/v0/b/gitbook-x-prod.appspot.com/o/spaces%2FGKnrvJSGeWbW7GGTr6Dv%2Fuploads%2FEqKxmPtCzxDsuyprFnGT%2Fimage.png?alt=media&#x26;token=061dda72-efca-4c8d-bb90-07b59577e55b" alt=""><figcaption></figcaption></figure></div>

In the "Alert Enrichment" section, I set the following.

<div align="left"><figure><img src="https://175589723-files.gitbook.io/~/files/v0/b/gitbook-x-prod.appspot.com/o/spaces%2FGKnrvJSGeWbW7GGTr6Dv%2Fuploads%2FzyDiRdtn0SXQoyNdtoaG%2Fimage.png?alt=media&#x26;token=f25ce696-ee09-41a4-b7c3-3fe2cee11cb3" alt=""><figcaption></figcaption></figure></div>

I set the Query Scheduling to 5 minutes.

<div align="left"><figure><img src="https://175589723-files.gitbook.io/~/files/v0/b/gitbook-x-prod.appspot.com/o/spaces%2FGKnrvJSGeWbW7GGTr6Dv%2Fuploads%2F20rKIbS65o0c6OT7gsON%2Fimage.png?alt=media&#x26;token=0137e492-4bbe-46d6-9c3f-ac81f42aebd8" alt=""><figcaption></figcaption></figure></div>

Once everything was set, I clicked "Create".

<div align="left"><figure><img src="https://175589723-files.gitbook.io/~/files/v0/b/gitbook-x-prod.appspot.com/o/spaces%2FGKnrvJSGeWbW7GGTr6Dv%2Fuploads%2FSmTwJbvK2S7ToKjCw24C%2Fimage.png?alt=media&#x26;token=277a4be7-377d-4779-95f2-9e4a7df8e7c2" alt=""><figcaption></figcaption></figure></div>

I then created a new scheduled task and checked the events.

<div align="left"><figure><img src="https://175589723-files.gitbook.io/~/files/v0/b/gitbook-x-prod.appspot.com/o/spaces%2FGKnrvJSGeWbW7GGTr6Dv%2Fuploads%2FSYxbXgz4bbkJrVdDxwZx%2Fimage.png?alt=media&#x26;token=40d0f869-3d29-4634-ad94-2e938d372085" alt=""><figcaption></figcaption></figure></div>
